Related Links
|
These days it
seems like everyone is ditching their Independent Front Suspension
(IFS) in favor of installing a solid axle under the front of their
Toyotas. But don't get out the cutting torch before you first check
out Superlift's IFS lift system. This lift provides room for tall
tires, is built tough, and looks fantastic.
How it
works: For the rear of the
vehicle, Superlift offers several ways of lifting. You can choose
tall lift blocks, a smaller block with an add-a-leaf, or
replacement springs.  I went with the replacement springs. These
springs each contained four arched leaves in the pack plus a flat
fifth overload leaf, as well as a 3-degree alignment shim. The
stock springs on my 1987 4Runner used 3 leaves plus an overload
leaf. The lift for the front is more complicated. The front IFS
crossmember and lower control arms are removed. A new front
crossmember is provided that lowers the pivot points for the
control arms by four inches. A rear crossmember lowers the rear
points slightly further. I went with the replacement springs. These
springs each contained four arched leaves in the pack plus a flat
fifth overload leaf, as well as a 3-degree alignment shim. The
stock springs on my 1987 4Runner used 3 leaves plus an overload
leaf. The lift for the front is more complicated. The front IFS
crossmember and lower control arms are removed. A new front
crossmember is provided that lowers the pivot points for the
control arms by four inches. A rear crossmember lowers the rear
points slightly further.
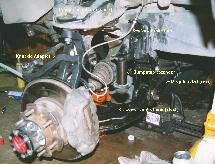 Since
these brackets spread the inboard ends of the control arms by about
four inches, the outboard ends need to be similarly spread to keep
a reasonable suspension geometry. This is accomplished with a pair
of knuckle adaptors. These bolt to the stock knuckle assembly,
moving the mount for the upper ball joint appropriately, and also
raises the mounts for the steering components to keep the steering
and ride the same. Since
these brackets spread the inboard ends of the control arms by about
four inches, the outboard ends need to be similarly spread to keep
a reasonable suspension geometry. This is accomplished with a pair
of knuckle adaptors. These bolt to the stock knuckle assembly,
moving the mount for the upper ball joint appropriately, and also
raises the mounts for the steering components to keep the steering
and ride the same.
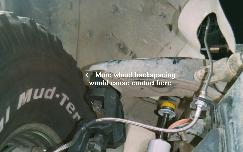 A side
effect of using knuckle adaptors is that you must use wheels with
3.75" or less backspacing. The reason: with the knuckle adaptors in
place, the end of the upper control arm is no longer inside the
wheel - its now just inboard of the tire itself. With more
backspacing, the upper control arm would slice into the tire. This
isn't a major limitation - for rollover resistance, you should
generally build your vehicle wider as you go taller, and less
backspacing accomplishes that goal. Furthermore, most aftermarket
wheels have 3.5" of backspacing. Still, don't plan on using your
stock 4.5"-backspaced wheels with this lift. To keep reasonable
angles on the CV joints, the front differential is lowered with
bracketry. A side
effect of using knuckle adaptors is that you must use wheels with
3.75" or less backspacing. The reason: with the knuckle adaptors in
place, the end of the upper control arm is no longer inside the
wheel - its now just inboard of the tire itself. With more
backspacing, the upper control arm would slice into the tire. This
isn't a major limitation - for rollover resistance, you should
generally build your vehicle wider as you go taller, and less
backspacing accomplishes that goal. Furthermore, most aftermarket
wheels have 3.5" of backspacing. Still, don't plan on using your
stock 4.5"-backspaced wheels with this lift. To keep reasonable
angles on the CV joints, the front differential is lowered with
bracketry.
 While there are several kits on the market that use this basic
method for lifting IFS vehicles, the Superlift sets itself apart by
using one-piece welded crossmembers integral to their control arm
mounting brackets. Furthermore, these crossmembers are made of
3/16" rectangular steel tubing. This is by far stronger than the
stock crossmember which is made of much thinner material.
First
impressions on the parts: I was
impressed by the overall quality, strength, and finish of the
parts. The smooth painted surfaces you see on most lifts tends to
show scratches easily. Superlift uses a textured black finish on
most of the parts. The texturing should go a long way towards
hiding imperfections and trail scratches, in much the same the the
texturing on house walls does the same there. The shocks provided
in the kit appeared to be of good quality, comparable in size and
construction to other off-road shocks. During the installation of
the lift, I also installed an optional Superlift steering
stabilizer. It is much larger than the wimpy stock unit, but still
fits perfectly in the original mounts, and the install of the
stabilizer only took minutes. On the rear springs, the paint finish
wasn't quite as nice as it was on the other parts. Springs are
usually shipped without a box, so they get a little nicked up
during transport. It won't affect the way they work, but it was a
departure from the great finish present on all the other parts.
Installation: Initially, the
installation took me about a week of evenings, but I was going very
slow and doing a lot of grinding and painting of scars beneath the
truck. Many trail miles had taken their toll on my stock
suspension. Most of its various mounting points had been bashed on
rocks and were bent out of shape. A better mechanic than me could
probably finish the install much quicker. With air tools, a lift,
and a less-abused vehicle to work on, this lift could probably go
on completely in a day or at least in a weekend. After the initial
install and testing, i spent a few evenings tweaking the
suspension, and I suspect I'll be fiddling with it for a while. The
installation instructions were somewhat better than I had
anticipated. The clear diagrams really helped to illustrate the way
things go together. Here's a brief rundown of the procedure.
Superlift's instructions are much more detailed, but this will give
you an idea of what is involved. Places where I deviated from
Superlift's instructions are in italics.
-
Do the rear lift first, so
you know how much to adjust the torsion bars in the front. The rear
springs came with no instructions, but the procedure was pretty
obvious. I ignored this step and dove into the front lift
first.
-
Jack up the front of the
vehicle, and rest the frame rails on jackstands a few inches
rearward of the swaybar mounts. Set the emergency brake and chock
the rear wheels. Remove the front wheels.
-
Remove the anti-sway bar and
front skid plate.
-
Remove the front
shocks.
-
Remove bolts that attach the
lower control arms (LCAs) to the frame. Dislodge the LCAs from the
frame and let them hang. I removed my LCAs altogether in order
to perform a needed replacement of one of my control-arm bushings,
and to paint my badly scratched LCAs.
-
Remove the front
crossmember. Bolt the new crossmembers in place using the stock
holes where the LCAs pivoted. These holes are actually slots used
for front-end alignment. Superlift provides large square washers
that align the crossmembers appropriately in the slots, and provide
instructions on dealing with crossmembers that don't quite fit
right. On my installation, the stock brackets were so badly
beaten from trail use I had to spend quite a bit of time beating
them back into shape so they would more readily accept the
Superlift crossmembers. Per Superlift's instructions, I
slightly modified some of the square washers to allow a good fit
between the frame brackets and the new
crossmembers.
-
Relocate the front
differential: Support it with a jack, remove the mounting bolts,
lower it with the jack, then install the supplied bracketry to hold
it in the new position. On my installation, a stock bracket that
had held the stock front crossmember was in the way of the mounting
hole on the front differential cover. I bent the now-unused stock
bracket out of the way.
-
Re-attach the lower control
arms to the new crossmembers. This is done with the stock cam
bolts. Since the new crossmembers are designed to allow a greater
alignment range, you need to remove the cam washers from the stock
bolts and press on some new supplied washers. This was a major
hassle and one part of the install I think could be improved.
Removing the old washers was trivial, but getting the new ones
pressed on properly took far longer than I expected. The
instructions say to use a section of pipe or tubing. This didn't
work for me. I eventually filed the holes a little bigger then
improvised a shop press with my bench vise. Those of you with a
hydraulic press will likely find this to be an easy task, but it
frustrated me.
-
Install the knuckle
adaptors.
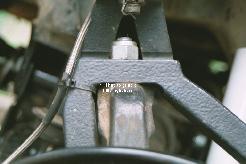 To do this, you need to remove the upper ball joint
with a puller. Then you insert the supplied tapered sleeve into the
tapered hole. This sleeve will remind many of you of the cone
washers used in many toyota hubs. It serves basically the same
purpose -- to provide a solid mating of a straight bolt in a
tapered hole. Then you bolt on the adaptor. I found that one
machined area of the adaptor wasn't quite wide enough for the
mating surface of the stock spindle. A moment with a disc grinder
solved that problem. To do this, you need to remove the upper ball joint
with a puller. Then you insert the supplied tapered sleeve into the
tapered hole. This sleeve will remind many of you of the cone
washers used in many toyota hubs. It serves basically the same
purpose -- to provide a solid mating of a straight bolt in a
tapered hole. Then you bolt on the adaptor. I found that one
machined area of the adaptor wasn't quite wide enough for the
mating surface of the stock spindle. A moment with a disc grinder
solved that problem.
-
Install compression travel
bump-stop extensions: Superlift provides these to extend the
bumpstops so the suspension isn't over-compressed. These extensions
are somewhat shorter than the four inches the arms are extended,
which means after the lift, you get more suspension travel than you
did in the stock configuration. These extensions are simply steel
cylinders with threaded holes on each end. On one side it uses
metric threads (to accept the stock bumpstop), and standard thread
on the other side (to bolt into the frame mounts with a supplied
bolt). A cool thing about this setup (not mentioned in the manual)
is that if you want to use standard-threaded aftermarket bumpstops,
you could simply invert the extensions. The threads on the
'standard' side mate perfectly with the few aftermarket bumpstops I
had in my parts pile, and all you'd need is a metric bolt to bolt
the 'metric' side to the stock bracket on the
frame.
-
Install front shock
absorbers. The instructions warn that some wide-bodied shocks might
interfere with the bumpstop extenders. I did not have that problem
with the Superlift shocks provided in the kit.
-
Brake hose relocation:
Instructions and brackets are provided for modifying the brackets
and routing of the stock brake hoses to work in the lifted
configuration. Alternatively, you can keep all the brackets in
place and use the optional Superlift extended brake lines. These
lines were covered with a tough braided stainless steel covering
that looks sharp. I chose this option.
-
Reinstall the anti-sway bar.
Brackets are provided that allow the bar to clear the front
driveshaft and for the endlinks to reach the
LCAs.
-
Reinstall the skid plate.
You can either re-use the stock skid plate or use an aftermarket
plate. I used Superlift's optional matching plate of 3/16" steel,
and I think it looks great mated with the ARB Bullbar I installed
while the truck was in the garage for the lift.
|
Related Links
|
-
Adjust the torsion
bars for final ride height to match the rear. The instructions
and diagrams give measurements for how high to adjust the bars for
4 to 5 inches of total lift.
-
Re-check all components for
tightness, etc.
-
Install "Warning to Driver"decal. The decal reads:
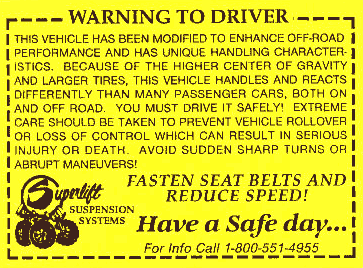 This is good advice.
It is important to install this decal - the warranty depends on
it. This is good advice.
It is important to install this decal - the warranty depends on
it.
-
Adjust headlights to proper
settings
-
Have a front end realignment
done, to stock settings.
The rear was quite a bit easier to put on. I simply replaced the
stock rear springs with the lift springs. The thicker pack,
combined with the alignment shim were too much for my stock
U-bolts, so I had to buy longer bolts. The new springs were
provided with polyurethane bushings. I had been using longer
aftermarket shackles with my stock springs. I went back to the
stock shackles for use with the Superlift springs.
First
impressions with lift installed
Wow, this lift looks great. I found a nice deal on a used set of
33x12.50 BFG Mud Terrain tires and had them mounted on the only set
of wheels I owned with the proper backspacing for this lift. It
took a little getting used to the step-in height with the added
height of the lift and the taller tires! Its was very surprised at
how much room the lift opens up around the engine bay and around
other parts of the vehicle. For instance, I believe with the lift
in place it would be possible to remove the oil pan without moving
the front differential or playing with the motor mounts. Similarly,
it is now a lot easier to get a hose into the wheel wells to spray
off mud or to remove mud flaps. Despite switching from an extended
spring shackle to the stock ones, the rear lifted higher than I
wanted - but I was shooting for the low side of the 4-5" advertised
lift. A big part of my problem was that I had added an ARB bullbar
and a Warn XD9000 winch at the same time as the lift. I suspected
that all the extra weight in front of the front axle had, like a
balance beam, removed a lot of the weight from the rear. This was
confirmed by a trip to the scales. The folks at Superlift advised
me to remove the leaf on the spring packs that was just above the
load-leaf. This solved the problem perfectly, and allowed me to go
back to the stock U-bolts.
Testing It
was time for the test drive! I have to be honest and say everything
wasn't 100% perfect the first trip out. I had a pretty bad
driveline vibration when coasting. After spending hours messing
with alignment shims and so forth, I discovered there was some play
in my transfer-case output flange. The vast majority of the
vibration went away when I re-torqued the bolt holding the flange.
I still have a tiny bit of vibration. Superlift says that vibration
complaints with this lift are rare, and that vibration is generally
due to worn U-joints, loose flanges, or an out-of-balance
driveshaft. I'm inclined to believe them -- my driveshaft has
certainly seen better days in the 175,000 miles of its lifetime.
Because of warning from others that a tall lift and big tires makes
for a lousy street ride, I wasn't expecting much in that
department. To my delight, the ride wasn't bad at all. The valving
on the Superlift shocks seemed to be just about right, and I didn't
notice any particular harshness. A local 4x4 shop has a ramp, so I
went to see how the new suspension would flex. I wanted to check
for things like brake line length, and shock sizing in a controlled
setting, before breaking things on the trail. I had taken some
baseline measurements before on the same ramp, so I would have a
basis for comparison. I also wanted to see how the fit would be
with the tires I was using. 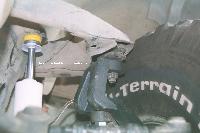 On the first trip up the ramp with the new suspension,
there was a variety of small problems. For starters, I couldn't go
as far up the ramp without lifting a wheel. Upon closer inspection,
I found that the knuckle adaptors, on compression, were binding
against the upper control arms in the area around the pocket that
holds the upper ball joint. I wasn't on the bumpstops. In the rear,
the added length of the lift springs (to accomodate the larger
arch) caused the shackles to lay down flatter than before on
compression (when the arched spring flattens out). The shackle went
back far enough, in fact, that they would bind against my rear
bumper mounts. Most of you won't have this problem - my custom
bumper uses mounts that are adapted from a Draw-Tite towing
receiver hitch, and these mounts don't give a lot of room for
shackle travel. On the first trip up the ramp with the new suspension,
there was a variety of small problems. For starters, I couldn't go
as far up the ramp without lifting a wheel. Upon closer inspection,
I found that the knuckle adaptors, on compression, were binding
against the upper control arms in the area around the pocket that
holds the upper ball joint. I wasn't on the bumpstops. In the rear,
the added length of the lift springs (to accomodate the larger
arch) caused the shackles to lay down flatter than before on
compression (when the arched spring flattens out). The shackle went
back far enough, in fact, that they would bind against my rear
bumper mounts. Most of you won't have this problem - my custom
bumper uses mounts that are adapted from a Draw-Tite towing
receiver hitch, and these mounts don't give a lot of room for
shackle travel. 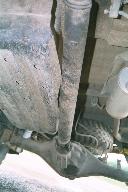 Other
potential problems I noted while on the ramp are that when the
right rear tire is stuffed into the wheel well with the left wheel
extended, the driveline would eventually make more contact with the
gas tank skid plate. This probably won't be a problem for those of
you with pickups - the 4runners have gas tanks that drop down lower
than the tanks on the pickups. When the rear axle was articulated
the other way, the cable for the parking brake was getting
stretched pretty far. Fortunately, there are few clearance problems
on a 4x4 that can't be solved with gratuitous use of a grinder.
Once I enlarged the opening on the underside of the upper control
arms, i could compress the suspension to the bumpstops, even at
full turning lock. For the rear, grinding away a part of the bumper
bracket bought back the articulation there. Finally, the problem
with the parking brake cable was solved by relocating a cable-clamp
from the frame to an existing hole on the spring hanger. Note that
most of these problems would be an issue with any lift of
this height, and are not specific problems with the Superlift
product.
On the trail Other
potential problems I noted while on the ramp are that when the
right rear tire is stuffed into the wheel well with the left wheel
extended, the driveline would eventually make more contact with the
gas tank skid plate. This probably won't be a problem for those of
you with pickups - the 4runners have gas tanks that drop down lower
than the tanks on the pickups. When the rear axle was articulated
the other way, the cable for the parking brake was getting
stretched pretty far. Fortunately, there are few clearance problems
on a 4x4 that can't be solved with gratuitous use of a grinder.
Once I enlarged the opening on the underside of the upper control
arms, i could compress the suspension to the bumpstops, even at
full turning lock. For the rear, grinding away a part of the bumper
bracket bought back the articulation there. Finally, the problem
with the parking brake cable was solved by relocating a cable-clamp
from the frame to an existing hole on the spring hanger. Note that
most of these problems would be an issue with any lift of
this height, and are not specific problems with the Superlift
product.
On the trail 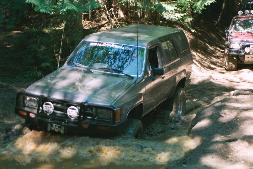 I
finally got a chance to test the setup at the Evans Creek ORV area
in Washington state. The lift performed well. The added clearance
below the rocker panels was a nice benefit and I spent a lot less
time than usual making contact between the terrain and parts of my
truck other than my tires. My friends even coaxed me into
attempting a truck-eating mud hole. I didn't make it through, but I
had a lot of fun getting stuck in and winched out! I
finally got a chance to test the setup at the Evans Creek ORV area
in Washington state. The lift performed well. The added clearance
below the rocker panels was a nice benefit and I spent a lot less
time than usual making contact between the terrain and parts of my
truck other than my tires. My friends even coaxed me into
attempting a truck-eating mud hole. I didn't make it through, but I
had a lot of fun getting stuck in and winched out! 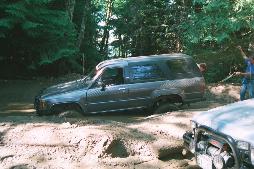 Incidentally, I had some non-related engine trouble
during this trip and had to be towed off one of the tougher trails.
I was extremely grateful to have the lift while being towed through
ruts deeper than my windows! The lift kept body damage to a
minimum. Due to some miscommunication and the lack of power-assist
steering and braking when the engine is off, I nearly rolled the
vehicle under tow. This near-rollover had nothing to do with the
new lift - I couldn't steer fast enough to keep up with the terrain
and accidentally drove off the trail and up a large embankment at a
high speed. I bring this up because the 4Runner was up on its two
left wheels, but eventually slammed down violently back on the
right side. The components of the lift took the impact well with no
damage. My head, on the other hand, slammed into my interior
rollcage. I think its time for me to write a review on roll bar
padding! Incidentally, I had some non-related engine trouble
during this trip and had to be towed off one of the tougher trails.
I was extremely grateful to have the lift while being towed through
ruts deeper than my windows! The lift kept body damage to a
minimum. Due to some miscommunication and the lack of power-assist
steering and braking when the engine is off, I nearly rolled the
vehicle under tow. This near-rollover had nothing to do with the
new lift - I couldn't steer fast enough to keep up with the terrain
and accidentally drove off the trail and up a large embankment at a
high speed. I bring this up because the 4Runner was up on its two
left wheels, but eventually slammed down violently back on the
right side. The components of the lift took the impact well with no
damage. My head, on the other hand, slammed into my interior
rollcage. I think its time for me to write a review on roll bar
padding! 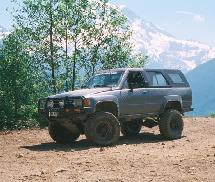 Overall, I'm very pleased with this offering from
Superlift. If you're looking to lift your IFS Toyota vehicle to fit
larger tires, have more ground clearance, and enjoy better approach
and departure angles, be sure to check this one out. Superlift
products are available from Rocky Mountain Suspension
Products. Overall, I'm very pleased with this offering from
Superlift. If you're looking to lift your IFS Toyota vehicle to fit
larger tires, have more ground clearance, and enjoy better approach
and departure angles, be sure to check this one out. Superlift
products are available from Rocky Mountain Suspension
Products.
Contact
Info
Rocky
Mountain Suspension Products
(800) 521-4908 |
Superlift Suspension Systems
211 Horne Lane
West Monroe, LA 71292
(800) 551-4955 Sales/Technical Support
(318) 322-3458 Main Office
(318) 323-5995 Fax |
Back to the Toyota section |
 I went with the replacement springs. These
springs each contained four arched leaves in the pack plus a flat
fifth overload leaf, as well as a 3-degree alignment shim. The
stock springs on my 1987 4Runner used 3 leaves plus an overload
leaf. The lift for the front is more complicated. The front IFS
crossmember and lower control arms are removed. A new front
crossmember is provided that lowers the pivot points for the
control arms by four inches. A rear crossmember lowers the rear
points slightly further.
 Since
these brackets spread the inboard ends of the control arms by about
four inches, the outboard ends need to be similarly spread to keep
a reasonable suspension geometry. This is accomplished with a pair
of knuckle adaptors. These bolt to the stock knuckle assembly,
moving the mount for the upper ball joint appropriately, and also
raises the mounts for the steering components to keep the steering
and ride the same.
 A side
effect of using knuckle adaptors is that you must use wheels with
3.75" or less backspacing. The reason: with the knuckle adaptors in
place, the end of the upper control arm is no longer inside the
wheel - its now just inboard of the tire itself. With more
backspacing, the upper control arm would slice into the tire. This
isn't a major limitation - for rollover resistance, you should
generally build your vehicle wider as you go taller, and less
backspacing accomplishes that goal. Furthermore, most aftermarket
wheels have 3.5" of backspacing. Still, don't plan on using your
stock 4.5"-backspaced wheels with this lift. To keep reasonable
angles on the CV joints, the front differential is lowered with
bracketry.
 While there are several kits on the market that use this basic
method for lifting IFS vehicles, the Superlift sets itself apart by
using one-piece welded crossmembers integral to their control arm
mounting brackets. Furthermore, these crossmembers are made of
3/16" rectangular steel tubing. This is by far stronger than the
stock crossmember which is made of much thinner material.
 On the first trip up the ramp with the new suspension,
there was a variety of small problems. For starters, I couldn't go
as far up the ramp without lifting a wheel. Upon closer inspection,
I found that the knuckle adaptors, on compression, were binding
against the upper control arms in the area around the pocket that
holds the upper ball joint. I wasn't on the bumpstops. In the rear,
the added length of the lift springs (to accomodate the larger
arch) caused the shackles to lay down flatter than before on
compression (when the arched spring flattens out). The shackle went
back far enough, in fact, that they would bind against my rear
bumper mounts. Most of you won't have this problem - my custom
bumper uses mounts that are adapted from a Draw-Tite towing
receiver hitch, and these mounts don't give a lot of room for
shackle travel.
  Other
potential problems I noted while on the ramp are that when the
right rear tire is stuffed into the wheel well with the left wheel
extended, the driveline would eventually make more contact with the
gas tank skid plate. This probably won't be a problem for those of
you with pickups - the 4runners have gas tanks that drop down lower
than the tanks on the pickups. When the rear axle was articulated
the other way, the cable for the parking brake was getting
stretched pretty far. Fortunately, there are few clearance problems
on a 4x4 that can't be solved with gratuitous use of a grinder.
Once I enlarged the opening on the underside of the upper control
arms, i could compress the suspension to the bumpstops, even at
full turning lock. For the rear, grinding away a part of the bumper
bracket bought back the articulation there. Finally, the problem
with the parking brake cable was solved by relocating a cable-clamp
from the frame to an existing hole on the spring hanger. Note that
most of these problems would be an issue with any lift of
this height, and are not specific problems with the Superlift
product.
On the trail
  I
finally got a chance to test the setup at the Evans Creek ORV area
in Washington state. The lift performed well. The added clearance
below the rocker panels was a nice benefit and I spent a lot less
time than usual making contact between the terrain and parts of my
truck other than my tires. My friends even coaxed me into
attempting a truck-eating mud hole. I didn't make it through, but I
had a lot of fun getting stuck in and winched out!
  Incidentally, I had some non-related engine trouble
during this trip and had to be towed off one of the tougher trails.
I was extremely grateful to have the lift while being towed through
ruts deeper than my windows! The lift kept body damage to a
minimum. Due to some miscommunication and the lack of power-assist
steering and braking when the engine is off, I nearly rolled the
vehicle under tow. This near-rollover had nothing to do with the
new lift - I couldn't steer fast enough to keep up with the terrain
and accidentally drove off the trail and up a large embankment at a
high speed. I bring this up because the 4Runner was up on its two
left wheels, but eventually slammed down violently back on the
right side. The components of the lift took the impact well with no
damage. My head, on the other hand, slammed into my interior
rollcage. I think its time for me to write a review on roll bar
padding!
  Overall, I'm very pleased with this offering from
Superlift. If you're looking to lift your IFS Toyota vehicle to fit
larger tires, have more ground clearance, and enjoy better approach
and departure angles, be sure to check this one out. Superlift
products are available from Rocky Mountain Suspension
Products.

 This is good advice.
It is important to install this decal - the warranty depends on
it.
 Your Privacy Choices