Project Tahoe: K&N Filtercharger Injection Performance Kit
Kickin' it with Clean Air
Kickin' It in Clean Air
By Pattie Waters We said one of the things we'd be
addressing in this daily driver was pulling some more power from
under the hood. First step - a Filtercharger Injector Performance
Kit from K&N. In other words, a new air filter. But not just
ANY air filter, oh no!
Let me remind you that this project is being overseen by little old
me, Karate Mom. I just want to get from Point A to Point B
reliably, and okay I admit, looking good. I don't want to have to
get an engineering degree to understand what we're doing to my
truck, or even get dirty lifting the hood. THAT'S what men are for.
But I do want to understand what's going on and why it will be
better after it's done.
 Another piece of the
puzzle that did make sense to me, is that air travels faster in a
straight line (my husband used to leave Fluid Dynamics books laying
around in college, and I probably dusted one once…). Since
paper air filters are just compressed wood fiber, there is no
"straight path", so the air flow going in to the filter as well as
coming out is seriously disrupted.
Another piece of the
puzzle that did make sense to me, is that air travels faster in a
straight line (my husband used to leave Fluid Dynamics books laying
around in college, and I probably dusted one once…). Since
paper air filters are just compressed wood fiber, there is no
"straight path", so the air flow going in to the filter as well as
coming out is seriously disrupted.
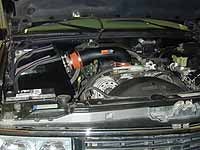
 We hit K&N in Riverside, California, early one Monday morning
mid-July, eager to begin the transformation. We could have just
installed the filter ourselves (it really is that simple), but an
important part of this errand was to get the truck on the dyno for
baseline for this entire project. With many more customizations to
go, it was important to see just what pieces gave us the most
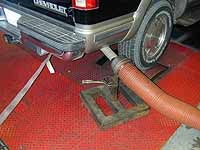
improvement. K&N was happy to oblige. Dave pulled her in,
strapped the frame down, put an exhaust hose over the pipe, clamped
on to a spark plug wire, turned on the fans to push the air, and
blasted my baby to speeds and RPM's I know she hadn't seen yet. At
least, not with me behind the wheel.
We hit K&N in Riverside, California, early one Monday morning
mid-July, eager to begin the transformation. We could have just
installed the filter ourselves (it really is that simple), but an
important part of this errand was to get the truck on the dyno for
baseline for this entire project. With many more customizations to
go, it was important to see just what pieces gave us the most
improvement. K&N was happy to oblige. Dave pulled her in,
strapped the frame down, put an exhaust hose over the pipe, clamped
on to a spark plug wire, turned on the fans to push the air, and
blasted my baby to speeds and RPM's I know she hadn't seen yet. At
least, not with me behind the wheel. 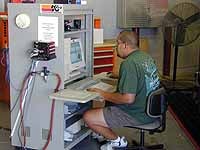 Chevrolet boasts 285 horses at 5,200 RPM for the 1998
Tahoe; more conservative numbers are estimated by CarPoint.com -
255 horsepower at 4,600 RPM, and torque 330 at 2,800; (Ok, I admit
I have no idea what these second numbers exactly measure or mean,
but even I know bigger is better!) These numbers are at the
flywheel, so we expected we'd lose quite a bit when measuring the
actual usable power delivered to the rear wheels. The dyno on my
baby with 42,000 miles on it confirmed less than stellar power
available -- our initial run showed horsepower peaking at 189 at
4,700 RPM. Yawn.
Chevrolet boasts 285 horses at 5,200 RPM for the 1998
Tahoe; more conservative numbers are estimated by CarPoint.com -
255 horsepower at 4,600 RPM, and torque 330 at 2,800; (Ok, I admit
I have no idea what these second numbers exactly measure or mean,
but even I know bigger is better!) These numbers are at the
flywheel, so we expected we'd lose quite a bit when measuring the
actual usable power delivered to the rear wheels. The dyno on my
baby with 42,000 miles on it confirmed less than stellar power
available -- our initial run showed horsepower peaking at 189 at
4,700 RPM. Yawn.
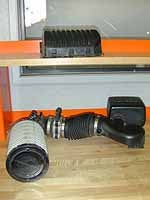
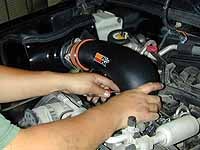
 Installation is very simple (of course, we had factory installing,
so I suppose it might have taken us a little longer on our own).
Remove the factory air intake parts. Set these aside, because you
will need the factory mass air sensor later on. Then, step by step,
attach each of the new gaskets, hoses, clamps. It's pretty
straightforward.
Installation is very simple (of course, we had factory installing,
so I suppose it might have taken us a little longer on our own).
Remove the factory air intake parts. Set these aside, because you
will need the factory mass air sensor later on. Then, step by step,
attach each of the new gaskets, hoses, clamps. It's pretty
straightforward.
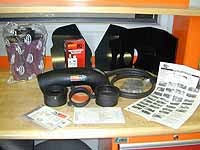
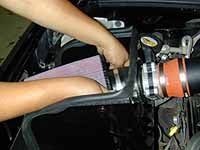
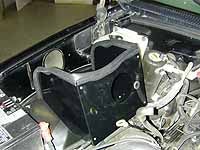
 Assemble the
firebox on the workbench as instructed - remember to "ooh" and "ah"
at the powder coating. When you mount the box onto the inside of
the fender, don't forget the foam pad to keep the bolt heads from
tearing a hole in the pretty new filter.
Assemble the
firebox on the workbench as instructed - remember to "ooh" and "ah"
at the powder coating. When you mount the box onto the inside of
the fender, don't forget the foam pad to keep the bolt heads from
tearing a hole in the pretty new filter.
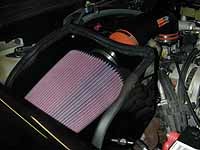
 Eager to see
results, we fired up the Dyno. Problem was, the outside temperature
was 15 degrees hotter than it had been for baseline, and the
computer doesn't fully re-adjust for the new equipment for about
150 miles. Keeping those factors in mind, we saw a respectable
immediate increase of 5-9 horsepower, and on the trip home saw
almost a full mile per gallon fuel efficiency increase (highway).
We aren't even close to the HP the factory is proclaiming, but we
aren't done yet…
Eager to see
results, we fired up the Dyno. Problem was, the outside temperature
was 15 degrees hotter than it had been for baseline, and the
computer doesn't fully re-adjust for the new equipment for about
150 miles. Keeping those factors in mind, we saw a respectable
immediate increase of 5-9 horsepower, and on the trip home saw
almost a full mile per gallon fuel efficiency increase (highway).
We aren't even close to the HP the factory is proclaiming, but we
aren't done yet…
|
What is
it? Aftermarket performance boost by swapping out the air
filter and entire air box What vehicles can use it? Any late model with a fuel injected motor, that does NOT have a body lift What's it gonna cost me? You can pick up the K&N Gen II System at your favorite parts store, or order it online - best price we found was through our friends at www.PerformanceProducts.com for $268 |
Then I can better recognize the little pings and kerchunks when it doesn't sound right. Make sense? So I did have to do a little reading up on why something as simple as an air filter is the first stop on this journey to "cool".
A Chick's Guide to Air Filter Technology
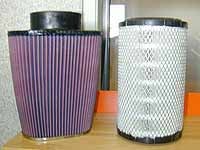
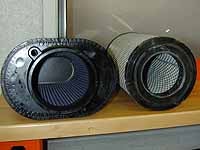
First to consider - what the filter is made of. We're all used to seeing those big round paper babies that you pick up for $6 at K-Mart, and you get charged $22 for replacing every 6 weeks at your corner BargainLube. However, in the 1960's K&N played around with it and discovered that by simply using cotton gauze oiled to trap the dirt, the same amount of gunk is trapped.With simple maintenance, it's good for 50,000 miles instead of 10,000.
Even more so with foam filters. So it bounces around and is slowed considerably before it even reaches the engine. K&N's idea was to straighten out this path before moving the air on. They do this by providing a final step of a fine wire mesh outside the filter. Seems too simple, but it apparently works since it delivers 50% more air than similar paper filters, per square inch.
A Man's Guide to Air Filter Technology
If you are more technical than this, or if I have just totally misunderstood and screwed up what is really happening, check out the full scoop at: http://www.knfilters.com/affacts.htm It has lots of pretty pictures, and words with lots of syllables. It also explains why off-road driving requires a different air filter than factory stock, in case you didn't already know. I'd like to lead you to believe that I did all this homework before I had the work done - kind of like writing the outline before the report. But I confess. I really didn't care until I spent four hours at the R&D shop in Riverside, watching the truck on the dyno and looking at the inside of air filters, reading reviews from various magazines exalting their newly-found performance.Then I had to come home and understand WHAT I had just seen. Seemed too awesome to be so simple.
Hookin' Her Up
He did let me know that it was actually okay my tires were bald - larger diameter tires, especially off-road tires with aggressive tread, tend to "hop" on the dyno, and you'll see serious spikes in the computer reading. He didn't seem concerned that it would hop completely off the rollers and drive through a wall, but rather that his data wouldn't be accurate. What a trooper.
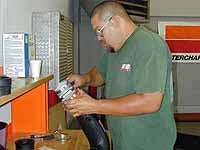
Installation of FIPK
Once we recorded three baseline measurements in both 2nd and 3rd gear, it was time to watch Dave do the actual install. The kit comes with very clear instructions, each part and piece is obvious. We did find that ours had a couple wrong sized washers or bolts; it initiated a mad scramble of staff to track down not just the piece we needed, but to IMMEDIATELY track the lot number in order to make sure any other kits were corrected as well.It will ride directly on top of these bolts so the padding is important. It's a very inconspicuous piece of grey foam, easily mistaken for packing, so key your eyes open when dumping the parts out of the bag. 34 steps, 1 hour total labor, you are done.
Things the Directions Don't Tell You
-
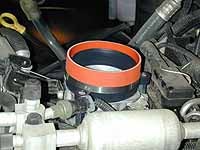
- The mass air adapter is shown in the directions as black
rubber; in our kit, it was made of red silicon rubber, four layers
with imbedded cloth material. Dave says they weren't happy with the
reliability of the rubber, and the silicon design is showing to
hold up much better. So don't go looking for a black one if yours
is red.
- Directions show putting the rubber trim seal on after the box is installed onto the firewall - Dave did it while it was still sitting on the workbench, so he could trim and fit it better. Suggest you do the same - you will be removing about 5" of material, and several snips so you get good 90 degree corners.
Things the Directions DO Tell You
- You are directed to disconnect your battery, however, they do
point out pro's and con's that you should consider. If you
disconnect, it will allow your computer to adjust and reset to your
new equipment sooner, but you may lose programming of the auto
alarm on the stereo system, or something. Accurate performance was
more important to us than what station our radio was on, so we went
for it.
Turned out it didn't screw up our radio anyway. You may have additional concerns if you have a security system - check that you know how to deactivate and reactivate before you disconnect your battery.
- Because the new box bolts to the firewall of the engine compartment, the directions state at the top it is NOT compatible with a body lift. I suppose you may be able to fabricate and customize your way around this; we will simply be looking for a suspension lift instead of a body lift to keep this project as straight-forward as possible.
The "After" Story
| A Fun Fact For Desert Dwellers According to the Dyno, you lose 10 horsepower immediately when the air conditioning is running - turning it off to climb hills is not just a good idea to avoid overheating, it may make the difference in even getting up the hills! |
What's Next?
On tap for August work is a suspension lift, new wheels & tires. Rough Country is shipping us their new 2-3" luxury ride lift. Also coming is a much-needed set of PowerSlot brake rotors from Power Performance Group. I am VERY excited about this one, and so are all the people in front of me at stop lights, nervously glancing in their rear view mirrors as I approach… As they say, stay tuned! Questions or Comments about this page should be directed to the author, Pattie Waters: ptw@Off-Road.com|
Off-Road.com Newsletter Join our Weekly Newsletter to get the latest off-road news, reviews, events, and alerts! |
Follow @Off-Road
 Your Privacy Choices