| Getting Rid of the Key |
We received an email from Steve regarding the key switch on the 230. Here it is:
I noticed that you took the keyed switch and moved it to the bars with kind of a make-shift switch mounting. I thought that this link might help solve a problem.
http://crfsonly.com/howto/230f/key/key-230f.php
Good luck and this is another possible solution.
Steve
We followed Steve's link and found a treasure house of information at CRF'S ONLY, a site dedicated to the various Honda four strokes. Not only does CRF'S ONLY have a big forum with feedback from CRF owners, they also offer all kinds of parts and accessories for the bikes and riders. The site address is: www.crfsonly.com
|
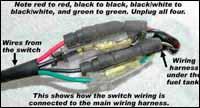
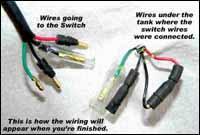
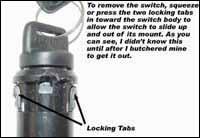
REMOVING THE CRF 230 KEYED IGNITION SWITCH The keyed ignition switch on the CRF230F is nothing more than a locking kill switch. When the switch is turned off, the ignition is disabled, so the engine will not start. Then by removing the key, it will be difficult (and time consuming) to hot-wire the bike to start the engine. It's a light, reliable, and handy theft deterrent, and nothing more. Nevertheless, I and many of the CRF230F owners prefer to remove the keyed ignition switch, to reduce complexity, improve reliability by removing a part that could fail, to rid the bike of a few ounces of needless weight, and because we're worried about losing or forgetting the stupid key! Luckily, this is very easy to do, following these step-by-step instructions.
|
| Project CRF230F Questions and Feedback |
Hey Super Hunky,
Thank you for writing the article on the CRF 230 front end fix. As a proud
owner of one of these fine bikes, I have found the front end to be nothing
short of dangerous for more aggressive riders. I have termed my ride the
"bone crusher" as I have landed my self under an xray machine
twice as the result of the lack of front suspension. Once with a broken
collarbone and once with a broken arm which was the result of bottoming
out the suspension in a wash. Didn't even have to dump the bike for that one.
However the bike is solid and dependable so rather than give up on it, I am in the process of putting a 97 CR125 front end on mine. Had I read your article sooner I probably would have gone with the older conventional forks, as my project has been considerably more time and $ invested, but I think the end result will be well worth it. I rounded up the forks and top and bottom triple clamps from salvage for a total of $120.
Using the 97 triple clamps requires that a new steering stem identical to the one in the 230 be machined. This would be the spendy part if you don't happen to be good buds with a good machinist. Then just press the new stem into the 97 CR triple clamp and you can use the stock steering head bearings and dust seals. I don't think a spacer should be needed. I also purchased salvage front wheel assembly to fit the 97 CR forks including, axle and disc rotor. Another $200 roughly.
Could I possibly
have just switched the wheel bearings out to fit the 97 CR axle, or was
the entire wheel assembly necessary? The brake caliper from the 230,
thankfully, is a match and will fit on the 97 fork mouts. The only problem
I forsee here is that I may need to get a longer brake line as the CR
forks are a couple inches longer even though I have pushed the forks up
through the tubes as far as possible. I should have this project buttoned
up in the next week and I'll let you know how it works. Next I'll be
adding the works performance rear shock so the back end can keep up with
the front. Thanks for all your insight to the world of bike mechanics.
Kari Christman
I read your email with great interest, as I'm about to put a modern (upside down ) set of forks on the Project 230.
I'm doing it as an experiment more than anything else, as the conventional forks are quite good. You spent some money that you shouldn't have. You could have used the stock 230 wheel and some NSK wheel bearings (# 6003VVC3) with a one mm spacer on each bearing. That way, you have could used the stock 97 front axle with no modifications at all. You won't need a different brake line; the stocker is long enough, but you may have to relocate the guide on the bottom triple clamp. Keep me posted on how your project progresses.
| Project CRF230F Questions and Feedback |
Good job on the fork fix but way more than the common guy could do or would try to do. There has to be an easier fix for the 230 forks. It seems to me that my 230 fork springs are right for my weight of 165 lbs and is just a matter of getting the compression and rebound dampening right. I wish you would have experimented with enlarging the compression holes and the rebound can always be adjusted with oil weight.
I think I might try
the emulator after I install my works shocks.
Thanks for the great article's on the CRF230. I like the pictures!
John Darby
Senior over 70 class.
You're still going to have a very wimpy set of forks (37 mm) with about 9.5 inches of travel. If you try to get more travel out of those forks, you'll lose engagement between the fork tubes and the sliders. My fork swap is not that difficult compared to taking the damping assembly apart and re-engineering it. The only things that are critical are the spacers and pressing them into place. Everything else is simple. Keep posted to the Project, as we're not done yet.
| Project CRF230F Questions and Feedback |
Can you still put
the countershaft sprocket cover back on the bike after going from a 13
tooth to a 15 tooth countershaft sprocket? Or is there not enough
clearance once you replace the 13 tooth?
Regards,
Chris
Brentwood, TN
The c/s cover was left off. There's not enough clearance and the cover is not needed.
| Project CRF230F Questions and Feedback |
Rick,
I talked to the Honda shop an attempted to buy the P/N's you listed
(Needle 16012-KPS-920 and Main Jet 99113-GHB1320). I kinda got the
"Run Around" on atempting to get a price and availability on the
parts. They said that the CRF230F had a 102 Jet stock. The number that you
list, they said was a smaller 92 Jet. I would like to have the parts
before I take the Carburetor apart, if possible.
Could you possibly give some more information on the Jet size that that was in the cycle and what size you actually installed. How much bigger did you go? Also, couldn't the stock needle just be raised a notch or two rather than putting in another one? Did you change the Pilot jet from a 42?
Any clarification
you can give me on this will be appreciated.
Jack Rollins
The taper (or profile) of the needle is different from stock and affects how the engine runs in regards to the slide position in the carburetor; It should be used in conjunction with the new main jet, and removal of the airbox baffle and butt plug from the exhaust (did I say that?).
You might want to visit a different Honda dealer if these folks are giving you the run around. Sounds like they're too proud of their parts to sell them if calling in an order for the part is too much trouble.
| Project CRF230F Questions and Feedback |
I read in your notes
that you ride in Baja. I am in California, and am
interested in doing some of your mods. Is removing the baffle, and modding
the airbox still California legal?
Mike
It's a pure dirt bike and not subject to street bike or dual purpose rules. As long as you don't run an open exhaust, you're OK.
| Project CRF230F Questions and Feedback |
I had been off a bike for thirty years when I decided to buy a Honda VTX. Five months later Hurricane Katrina brought almost eight feet of water through my house and the bike was a total loss. I'll get another road bike later but now I want to get back to my roots and get a dirt/trail bike.
I've decide on the Honda CRF230 and was looking for info when I found your articles on this bike. These are great. When your last dirtbike came with two rear shocks and Hodaka was still winning races at the local tracks you are to old to experiment on your own. The articles you've written should put me farther out on the learning curve in a shorter amount of time.
Thanks for taking
the work out of what should be a fun process.
Michael E. Henderson
The Project Series was done especially for guys like you, hence the title: The Right Bike For The Right Time.
| Project CRF230F Questions and Feedback |
It has been almost
ten months since this article was written. Because I am probably going to
buy a new crf230 within the next month I would like to contact Rick Sieman
for an update on the things he noted as detractions to this model. Can you
forward this email to him or send me his contact info.
Thanks,
Michael E. Henderson
Please see: http://www.off-road.com/dirtbike/projects/crf230f/1/
| Project CRF230F Questions and Feedback |
you say cr85 forks
go into stock crf230 clamps i have read else where that the whole cr85
frontend is req ???
Steve Schulz
The older forks will fit, but the newer CR 85 forks require that the entire front end will be used, as the newer forks are upside-down models. Either way, why bother?
| Project CRF230F Questions and Feedback |
Greetings,
First I would like to commend you on your excellent website. I have found
the information regarding the CRF230F very beneficial to the work I'm
looking into doing. Today I began phase 1 "Uncorking the CRF";
in doing so a couple questions came about that I am looking for clarity.
1st In the illustrations on removing the baffle you indicate the removal of the three screws and then the 25 torx to remove the baffle. I was able to unscrew the 25 torx and pull the baffle right out without having to touch the three screws. Am I missing something in your instructions, or is removing the three screws even necessary?
2nd I have attached a picture of the contents of Honda's part number 16012-KPS-921. In the picture are the jet needle with clip and the needle jet; it is the needle jet that is the object of my concern. Your article mentions nothing about removal and installation of this item. It is my hopes that changing it out must not be all together important. I removed the needle jet holder and the main jet; however even with a light tap of a plastic screw driver handle down the throat of the carburetor I was not able to coax it out of there. I decide to leave the one that was in there alone rather than getting aggressive with it. I am interested in more information on whether it needs to be changed; if so, what's the trick to getting it out of there?
Currently I am waiting on a BBR exhaust and a UNI filter, as well as a #132 main jet you have recommended to come in. That being the case, I have left the baffle in the muffler and the intake, installed the new needle and went for a ride. My bike has GPS so I decided to gather a little data prior to the change out. My findings were a little interesting. The conditions for the run were the same each time and took place on the same stretch of smooth road with a crisp north wind behind me. On my stock run I managed to squeak out a top speed of exactly 70 miles an hour.
After I switched the needle out I noticed the bike wasn't its usual cold natured self and seemed to have a beefier feel on acceleration, however although it seemed to have more torque, my top end came up a little short of what I had expected. This time it max'd out at 67mpg. I am guessing that the slightly slower run had more to do with the un-scientific circumstance of my test than they do the needle change. I am positive that the addition of the 132 jet, intake mods, and a BBR exhaust are going to make a difference I'm looking for. None the less it made for a great afternoon of tinkering on my scooter. I am looking forward to hearing your response on the needle jet and the baffle.
Attached is a
picture of my wife and I while on a ride at Big Bend Natural Park. As you
can see in the pictures, they've both been dual sported out and made
street legal so we get to enjoy riding around the country side close at
home as well. They have been great bikes thus far! Thanks again!!!
Garry Janota
I checked out the stock needle jet and it appears to be the same as the one that comes with the power-up kit. It's essential that you run the new main jet. We used the pipe with the baffle out and it ran best like that.
| Comments on This Article? |


 Your Privacy Choices